Exercises in Photographing Mercury in front of the sun
and in Measuring its Position
First off all and most important:
NEVER try to photograph the sun without using a solar filter (made from glass or film) in front of the telescope/camara lens!
Detailed annotations about building solar filters, mounting the camera, ... can be found on Tim Cole's noteworthy page Solar imaging with a digital camera and in Fred Espanak's Transit of Mercury 2019 page.
On this page we only give short tips in order to motivate the participants doing exercises early before November 11th.
- The camera should be mounted on a solid tripod.
- To avoid blurred images
- a remote-control release should be used, if possible and,
- in case of a reflex camera, the mirror should be fixed (if possible).
-
The focus must be as exact as possible because a bad focus causes uncertainties in determining the sun's radius and errors in measuring the position of Mercury. But this position has to be measured with greatest precision!
The visual impression of a good focus when looking through the viewfinder is no guarantee for a well focussed picture!
The edge of the sun, possible sunspots and, perhaps, Mercury itself will offer good opportunities for focussing. Using the life view or test photos on the laptop from which the camera is been operated or of a magnifier for the viewfinder (both today features of many digital cameras) may facilitate the focussing.
-
The exposure time must be suitably chosen so that the picture is neither too bright nor too dark. Some hints may be useful:
-
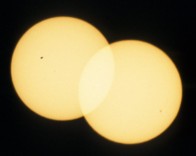
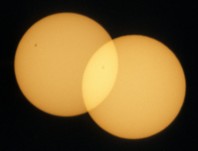
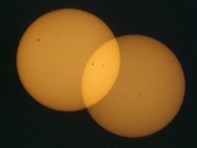
If the camera can exposure automatically it should be tested if shortening the time by one or two steps yields better results (see the examples below).
| 90 seconds time difference
|
 |
 |
 |
| Automatic exposure |
Automatic exposure -1 step |
Automatic exposure -2 steps |
-
Most often the brightness of the picture is measured in the center of the picture. Therefore, by automatic exposure, the sun will be taken with different brightness depending on its position on the picture (see the left picture below).
-
Perhaps it will be better to choose a fixed exposure time. Of course, it depends not only on the aperture of the optic but also on the sun´s elevation above the horizont and on the state of the atmosphere!
- A histogram is another possibility to check if the image is properly exposured. Most modern cameras offer histograms as a possibility of controlling. Otherwise, the pulic domain program ImageJ offers that possibility for analysing images. No pixels of the images should be saturated.
- Because of turbulences in the atmosphere it will be advantageous to make several images shortly one after the other (automatically, if possible) instead of only one and to select the best of them ex post.
Example: The sun April 18th, 8:26 UT
The 7 images, automatically repeated within a second, show significant differences. The most right image has been taken from NASA's Solar Dynamic Observatory (SDO) from above the atmosphere; it has been taken about two hours later.
Into the complete image and into the most left cutout we have artificially mounted Mercury in it's natural size. It demonstrates the importance of preferably sharp images!
- The best of these images you may upload to the database via the according data exchange page.
back to top
As described in the basic ideas of this project we propose to photograph the sun twice with fixed camera in order to be able to determine the position angle of Mercury with respect to the direction to west. Afterwards, these pictures can (but must not!) be superimposed using a software like ImageJ. The difference in the pixel positions of the sun (in the two single pictures or in the combined picture will show the westward motion of the sun due to the earth's daily rotation.
Preconditions of this procedure are, of course, that
- the size of the sun in the picture is small enough so that its center can be determined with high accuracy and
- the size of the picture is large enough to show more than one image of the sun with determinable center. The smaller the sun's face is compared with the size of the picture the longer the time interval can be chosen and the more exactly the orientation of the picture can be determined.
The following hints may be useful:
- For this procedure a very stable tripod is even more important than for single exposuring.
- Using an autotracking it must be possible to switch off the automatic for some minutes, because even parallactic mountings never are justified with sufficient accuracy. Alternatively, the right ascension can be shifted slightly to observe its direction on the picture.
- The time difference between both pictures should be adjusted to a fixed value. If it is maintained carefully (with a stopwatch) the known daily motion of the sun (in degrees/hour) can be used to determine the scale of the image and the angular radius of the sun. When the time difference is 150s or larger the both solar faces don't overlap on the combined image.
- Be careful: The sun tends to leave the picture in the meantime!
- And, most important: Multiple exposuring must be exercised!
For the processing of digital images we recommend the public domain program ImageJ. But there are many other programs offering appropriate manipulating possibilities. The following advices refer to "ImageJ".
The combination of successive photos can be done by the following steps (sequence of menu items to be followed in red):
- Open the images simultaneously with the program: File → Open


- Stack the pictures: Image → Stacks → Images to Stack
- Combine the pictures laying one "upon" the other (in the z-direction): Image → Stacks → Z Project.
Following kinds of ZProjection should be tested:
- Average Intensity
- Max Intensity
- Sum Images
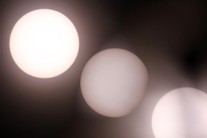
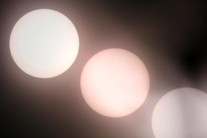
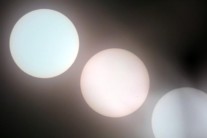
In most cases the max-option seems to yield the best results. (The pictures have been taken with little experience with a new camera and at difficult weather conditions.)
back to top
- Knowing the time difference between the combined pictures you are able to determine
- the orientation of the image,
- the scale of the image (provided the decination δS of the sun is known) and
- the angular radius ρS of the sun.
- There are several tools for measuring the positions of Mercury with respect to the sun's face. In this project, we offer the program evaltransitpicts. With that program, the sizes and positions of the sun and Mercury on digitized pictures (BMP or JPG format) can be measured. (For elementary methods of measuring it see the additional project Measuring the angular radius of the sun of the project in 2012.)
- Pixel radius and centre of the sun are determined by fitting a circle to it.
- By fitting a further circle to the second image of the sun the amount and the direction of the sun's displacement (and, thereby, the direction from East to West!) are determined. If the corresponding time difference and the celestial position of the sun are known the scale of the picture and the angular radius ρS of the sun can be derived from these values (see our example of the 2012 project)
- By fitting of two additional circles to both discs of Mercury the rectangular positions x'=x/ρM and y'=y/ρM of them are measured with respect to the sun's centre. The x-axis points to West, the y-axis to North.
- The program provides ρS as an additional result.
- Examples and Exercises
- Mercury's position on May 9th, 2016, 12:00:04 UT, as photographed from Hannover
- The pictures are shown on the page basic ideas.
- The pixel radii of the sun are 864px and 863px, the angle to west is -10.93°.
- The sun moved in 151s by 1971.8px.
- Because of the declination of the sun (17.5°) its daily motion in the interval is cos(δS)*360°/24h*151s=15.78´
- The rectangular coordinates of Mercury at 12:00:04 UT are x´=-0.81725, y´=0.02741.
- Positions of sunspots during the months before the transit 2019
- The sunspot on March 18th, 2019, 14:15 UT
-
Double exposed image
(The images, separated by Δt=165 s, and the evaluation sheet can be found on the pages for data exchange.)
- The the two solar discs have the centers and the radius
xS1=1326 px; yS1=1192 px; xS2=3326 px; yS2=2210 px; rS=876 px;
- The inclination i of the axis east --> west therefore, is
i = arctan((yS1-yS2)/(xS2-xS2))=-26.98°
- During Δt, the sun has moved by 2244 px.
- The sun's declination is δS=-1.02°. The angular velocity of its daily, therefore, is
ωS=360°/24h*cosδS=0.25'/s
and it has moved by 41.24' during Δt.
- The scale of the images is
41.24'/2244px = 1.10"/px.
Therefore, the angular radius ρS of the sun is
ρS = 1.10"/px * rS = 16.10'
- The sunspot on the first images has the pixel coordinates
xM=1228 px, yM=852 px.
With respect to the solar center its coordinates are
xM-xS1=-98 px, yS1-yM=340 px, rM=353.8 px.
- Its angle of position with respect to the lower edge of the image is
180°-arctan(-340px/98px)=106.08°
(It would be better to use the arctan2-function here to get the correct angle directly.)
- With respect to the axis east--> west the position angle φ of the sunspot is
φ=106.08°-i=133.05°
- Finally, we've determined the following position of the sunspot with respect to the solar radius and the direction from east to west:
ρ'=rM/rS=0.4039, φM=133.05°, x'=ρ'*cosφ=-0.2758, y'=ρ'*sinφ=0.2952
-
SDO-image
In the archive of the SDO you can find the following HMI Intensitygram (orange) for 14:15 UT:
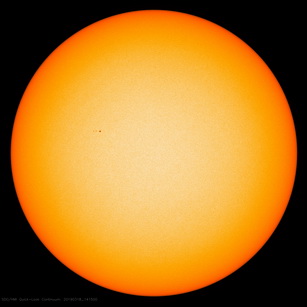
- On this picture you can measure the following pixel coordinates:
xS=1024 px, yS=1024 px, rS=956 px, xM=665 px, yM=878 px.
- In the same manner as above the following values can be determined:
ρ'=0.4054, posW=157.9°
- The position angle has been measured with respect to the lower edge of the image. To determine the ange with respect to the axis west --> east it must be corrected because on the SDO images the axis of rotation points upward. The position angle of the solar north pole can be found on several sites (on NASA's HORIZON's Web-Interface, for instance). Or it can be calculated with the little (Windows-) program solarPosAngle. At the moment of interest it is -24.89° (that means that the sun is rotated clockwise). The position angle φ, therefore, is
φ=157.87°-24.89° = 132.98°
- The coordinates of the sunspot are
ρ'=0.4054, φ=132.98° x'=-0.2764, y'=0.2966.
The distance between the sunspot's positions, determined in different images with different methods is
Δp = 1.5".
- Here we will try to make dates for common position measurements on sunspots!
back to top

|

|
Editor: |
Udo Backhaus
 |
last update: 2020-03-19 |

|


